A new floor can completely transform the look and feel of a room. If you’re looking for a durable, stylish, and long-lasting option, tile is an excellent choice. While the process might seem intimidating, a DIY floor tiling project is a manageable and rewarding task for many homeowners. With the right tools, a bit of patience, and a solid plan, you can achieve a professional-looking finish that adds significant value to your home.
This guide will walk you through the entire floor tile installation process, from picking the perfect tiles to applying the final touches. We’ll cover everything you need to know to lay a beautiful, lasting floor you can be proud of.
Essential Tools and Materials
 Before you begin, gathering the right supplies is key to a smooth installation. Having everything on hand prevents frustrating interruptions and helps you work more efficiently.
- Materials:
- Floor tiles of your choice
- Tile adhesive (also called thin-set mortar)
- Grout (sanded for wider joints, unsanded for narrow ones)
- Tile spacers
- Grout sealer
- Painter’s tape
- Plywood or cement backer board (if needed for the subfloor)
- Tools:
- Tape measure
- Chalk line
- Level
- Notched trowel (size depends on tile size)
- Tile cutter or wet saw
- Rubber mallet
- Large bucket for mixing
- Drill with a mixing paddle attachment
- Grout float
- Large sponge
- Knee pads
- Safety glasses
Step-by-Step Floor Tile Installation
Follow these steps carefully for a floor that looks great and stands the test of time.
Step 1: Prepare the Subfloor
A successful tile job starts with a solid foundation. Your subfloor must be clean, flat, and rigid.
- Clean the Surface: Remove any existing flooring, like carpet or old vinyl. Scrape away any old adhesive, debris, or paint. Sweep and vacuum the area thoroughly to ensure it’s free of dust and dirt.
- Check for Level: Use a long level to check the floor for high or low spots. A floor that isn’t perfectly flat can cause tiles to crack over time.
- Level and Reinforce: Fill any low spots with a floor-leveling compound. Sand down high spots. If you have a wooden subfloor, you may need to install a layer of plywood or cement backer board to create a stable, water-resistant surface. This is especially important in bathrooms and kitchens.
Step 2: Plan Your Layout
Do not skip this step! A well-planned layout prevents awkward cuts and ensures a symmetrical, professional appearance.
- Find the Center: Measure the length and width of the room and mark the center point of each wall. Snap chalk lines between the opposite walls to create intersecting lines in the center of the room. This gives you a starting point.
- Perform a Dry Run: Lay out a row of tiles with spacers along your two chalk lines, starting from the center and working toward the walls. This “dry fit” allows you to see how the tiles will look and adjust your starting point to avoid thin, difficult cuts along the walls. Ideally, you want any cut tiles to be at least half a tile wide.
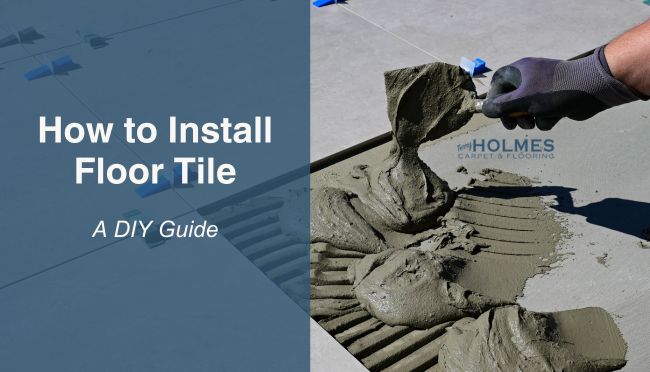
Step 3: Mix the Tile Adhesive
Follow the manufacturer’s instructions on the tile adhesive package precisely.
- Add water to your bucket first, then slowly add the powdered adhesive.
- Use a drill with a mixing paddle to mix the contents until you achieve a smooth, peanut butter-like consistency.
- Let the mixture sit (or “slake”) for 5-10 minutes, then give it a final mix. This allows the chemicals to activate properly. Only mix as much adhesive as you can use within about 30 minutes, as it will start to harden.
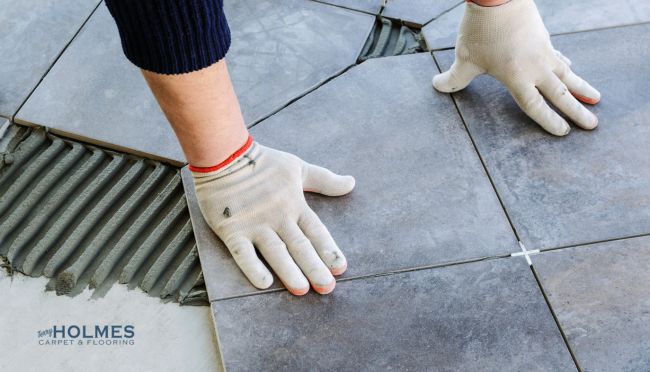
Step 4: Apply the Adhesive and Lay Tiles
Now for the exciting part. Working in small, manageable sections (e.g., a 3×3 foot square), you can start laying your tiles.
- Spread the Adhesive: Scoop some adhesive onto the floor with the flat side of your notched trowel. Then, use the notched side to comb the adhesive, holding the trowel at a 45-degree angle. The ridges ensure an even bed of mortar for each tile.
- Set the First Tile: Gently press the first tile into the adhesive at the intersection of your chalk lines, giving it a slight twist to set it firmly.
- Continue Tiling: Place the next tile alongside the first, using tile spacers to create uniform grout lines. Continue laying tiles one section at a time.
- Check for Level: Periodically use your level to check that the tiles are flat and even with one another. If a tile is too high, gently tap it down with a rubber mallet. If it’s too low, lift it and add a bit more adhesive.
Step 5: Cut Tiles as Needed
You will inevitably need to cut tiles to fit around walls, doorways, and obstacles.
- For straight cuts, a manual tile cutter is effective. Score the tile firmly and snap it along the line.
- For more complex cuts (L-shapes or notches) or harder materials like porcelain and stone, a wet saw is the best tool. Always wear safety glasses when cutting tile.
Step 6: Grout the Tiles
Wait at least 24-48 hours for the adhesive to cure completely before grouting. Check your adhesive’s instructions for the exact time.
- Remove Spacers: Pull out all the tile spacers.
- Mix and Apply Grout: Mix the grout according to the package directions. Apply it with a grout float, holding it at a 45-degree angle and pushing the grout diagonally across the tile joints to fill them completely.
- Remove Excess Grout: After applying grout to a section, use the float to scrape off the excess from the tile surfaces.
- Clean the Tiles: Wait about 15-30 minutes for the grout to set slightly. Then, use a large, damp sponge to gently wipe away the grout haze from the tiles. Rinse your sponge frequently in a bucket of clean water. Be careful not to pull grout out of the joints.
Step 7: Seal the Grout
After the grout has fully cured (usually 48-72 hours), apply a grout sealer. This final step is crucial for preventing stains and water damage, keeping your floor looking fresh for years. Use a small brush or applicator to apply the sealer directly to the grout lines.
Troubleshooting Common DIY Tiling Mistakes
Even with careful planning, issues can arise. Here’s how to handle them:
- Uneven Tiles: This often happens when the subfloor isn’t level or the adhesive wasn’t spread evenly. Check each tile with a level as you go and adjust immediately.
- Adhesive Dries Too Quickly: You may be working in an area that is too large. Only spread enough adhesive for a few tiles at a time. If a “skin” forms on the adhesive, scrape it off and apply a fresh layer.
- Crooked Grout Lines: This results from a poor layout or not using spacers. A dry run is the best way to prevent this.
Floor Tile Installation: Essential Tools & Materials
| Tool/Material | Purpose |
| Floor Tiles | Main surface covering, available in various styles and sizes |
| Tile Adhesive | Bonds tiles securely to the subfloor |
| Grout | Fills joints between tiles for a finished look |
| Tile Spacers | Maintains even spacing and straight grout lines |
| Notched Trowel | Evenly applies adhesive to subfloor |
| Tile Cutter/Wet Saw | Cuts tiles to fit edges and obstacles |
| Level | Ensures a flat, even tile surface |
| Rubber Mallet | Gently sets tiles without cracking them |
| Grout Float | Spreads grout into tile joints |
| Sponge | Cleans residual grout from tile surfaces |
| Grout Sealer | Protects grout from moisture and stains |
| Knee Pads | Comfort and protection while working on floors |
| Paint Tape | Masks off areas or protects edges during install |
Choosing the Right Tile for Your Space
The type of tile you choose can impact both the look and functionality of your room.
- Ceramic Tile: A popular and affordable option, ceramic is great for most areas, including kitchens and hallways. It’s easy to cut and install, making it a good choice for a first-time DIY floor tiling project.
- Porcelain Tile: Denser and less porous than ceramic, porcelain is extremely durable and water-resistant. This makes it an excellent choice for bathrooms, laundry rooms, and high-traffic areas.
- Natural Stone (Travertine, Slate, Marble): Stone offers a unique, high-end look. However, it is often more expensive, requires more maintenance (regular sealing), and can be more difficult to install.
Maintaining Your New Tile Floor

Your hard work is done! To keep your tile floor looking its best:
- Regular Cleaning: Sweep or vacuum regularly to remove dirt and grit that can scratch the surface.
- Mop as Needed: Clean with a pH-neutral cleaner and water. Avoid harsh chemicals or acidic cleaners like vinegar, which can damage grout and unsealed stone.
- Re-seal Grout: Depending on traffic, you may need to re-seal your grout lines every few years to maintain their stain resistance.
Installing your own floor tile is a project that delivers immense satisfaction. By following these steps, you can confidently create a beautiful and durable surface that enhances your home for years to come.
Tile Types at a Glance
| Type | Best For | Key Benefits | Maintenance Needs |
| Ceramic | Kitchens, hallways, living areas | Affordable, easy to cut/install | Low, regular cleaning |
| Porcelain | Bathrooms, laundry, high-traffic | Highly durable, water resistant | Low, occasional sealing |
| Natural Stone | Entryways, luxury spaces | Unique, upscale appearance | Medium, regular sealing |
Frequently Asked Questions About Floor Tile Installation
How long does it take to install floor tiles?
Most standard rooms can be tiled in one or two days, but the full process, including preparation, adhesive drying, and grouting, typically takes 2-4 days. Larger or more complex projects may take longer.
What is the best way to clean tile floors?
Use a soft broom or vacuum for everyday dust and debris. For deeper cleaning, mop your floors with a pH-neutral cleaner and water. Avoid harsh or acidic cleaners, particularly on grout and natural stone tiles.
Can I install floor tiles myself, or should I hire a professional?
DIY floor tiling is accessible for handy homeowners with patience and proper tools. For more complex patterns, uneven subfloors, or intricate tile cuts, professional installation is recommended.
Do I need to seal my tiles?
Most ceramic and porcelain tiles do not require sealing, but grout joints should always be sealed. Natural stone tiles generally need periodic sealing to prevent staining and maintain appearance.
What should I do if a tile cracks after installation?
Cracked tiles can be removed and replaced without redoing the entire floor. Use a grout saw to remove grout around the damaged tile, carefully lift out the tile, and set a new one in place using tile adhesive and grout.
Have more questions? Reach out to local flooring experts or consult your tile manufacturer’s recommendations for the best installation and care guidance.